Creating a Mood Board For Your Project
Mar 26, 2020 5320 seen
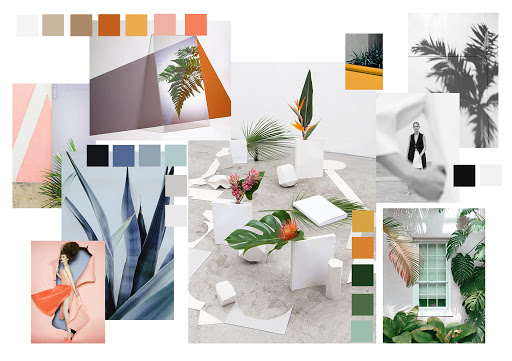
A mood board is a collection of visuals through which the designers' visions of a project are defined and communicated. Mood boards are done prior to any of the actual design work and are meant to set the direction and the tone for the entirety of the project.
Mood boards are most commonly shared with clients in an early presentation or as part of a pitch. They are also used withing design teams so that all members are aligned on the same visual language, as well as for inspiration and personal research. A full guide is presented below on how to make a mood board to elevate your project.
- Decide on a format
- Research and collect
- Curate your imagery
- Arrange your composition
- Ask for feedback
- Deliver the result to the client.
The Importance of Mood Boards
The importance of mood boards is manifested variously in kicking off your project with them. One of the brightest examples is the inspiration which can be fleeting and elusive, however, mood boards have a way of channeling the muses upon request.
Knowledge is power and mood boards are a great way of exploring what's been done before you. So a lot of researches is awaited on the way, during which you can find the biggest trends in your field to get inspired.
Describing the design in words is not easy - describing a project that does not even exist is the hardest ever. So mood boards can make it easier to convey your vision of the project to your client, boss, and team, aligning everyone involved on a shared understanding of the project early on.
Decide on a format
The first step in creating a mood board is to decide on its format. Always take into account your intent and pick the format the best suits your needs.
Paper displays may feel slightly old fashioned, but when it is done well, real-life mood boards are highly effective in conveying a message.
You can glue visuals to a foam board, tape an array of images up on the wall and also spread out objects on a table for people to walk around and get close to. Try as much as possible to include more than just printed images in your physical mood boards. However, in the case of digital boards, there are many ways to go about making them. For example, you can create from scratch with such programs such as Adobe Photoshop. When choosing a tool to work on your digital mood board, decide whether you want your mood board to be a presentation with multiple slides or a single page file and whether your want to share the final result with others.
Research and collect
Now it is time to roll up your sleeves and get to it. You should think about the mood and the feeling you want your project to convey. Gather many images around some topics you are thinking of and think of that as a visual brainstorming session - just grab anything catches your eye without letting you guess your choice for now.
For the mood board of a sushi restaurant, for instance it could make perfect sense to include photos of delicious-looking sushi rolls.
To increase your chances of coming across diverse results, look into many different sources of imagery. There are plenty of great browsing websites such as Pinterest, Behance and so on.
Curate Your Imagery
Just as you have enough images, take your time to look through them. See what comes up, play around by grouping together some of the emerging directions, and see what looks best together. During it, you may even find that the same project can be interpreted in a few different aesthetic directions or themes. You are also free to create multiple mood boards.
Then compile a collection of visuals that have cohesion and look like they belong to each other. Pick visuals that highlight diversified subject matters, such as color, typography, texture, photography, and art/illustration, in order to encapsulate your vision of the project.
Arrange Your Composition
With your mood board's finalized, now it is time to put everything together and arrange it into a single layout. There are various methods and tools for laying out your mood boards.
The composition of your mood board needs to make all of your different pictures come together in telling a coherent story. A good mood board should bring about an idea that is bigger than any of its individual components.
Ask For Feedback
Once your mood board is all done, now you should test it out and see how clear and communicative it really is. Show your mood board to friends and ask for feedback, explaining the general vibe and mood in their own words. Does each of the images make sense to them or not?
Deliver The Result To The Client
You can now share your mood board with your client or team. Remember that the mood board is not your final piece, but rather a means to an end. The end result being, of course, the actual project you’re about to embark on. When presenting your mood board to your client or team (either in person or digitally), be sure to communicate this message and explain how the visuals they see on the mood board might come to life in your work. Above all, use the mood board as a jumping point to open a conversation with your client or team, discussing the look and feel of the upcoming project and even getting into its nitty-gritty. After all, that’s what mood boards are really all about.


